
Extended Build Guide
Send ESP8266 + DHT22 Readings to a Web Server
Once the temperature and humidity readings are stable in the serial monitor, the next step is to place the device in the field and send readings to a web server. This guide uses hardcoded Wi-Fi credentials, sends HTTP POST data from an ESP8266, and receives the values with PHP.
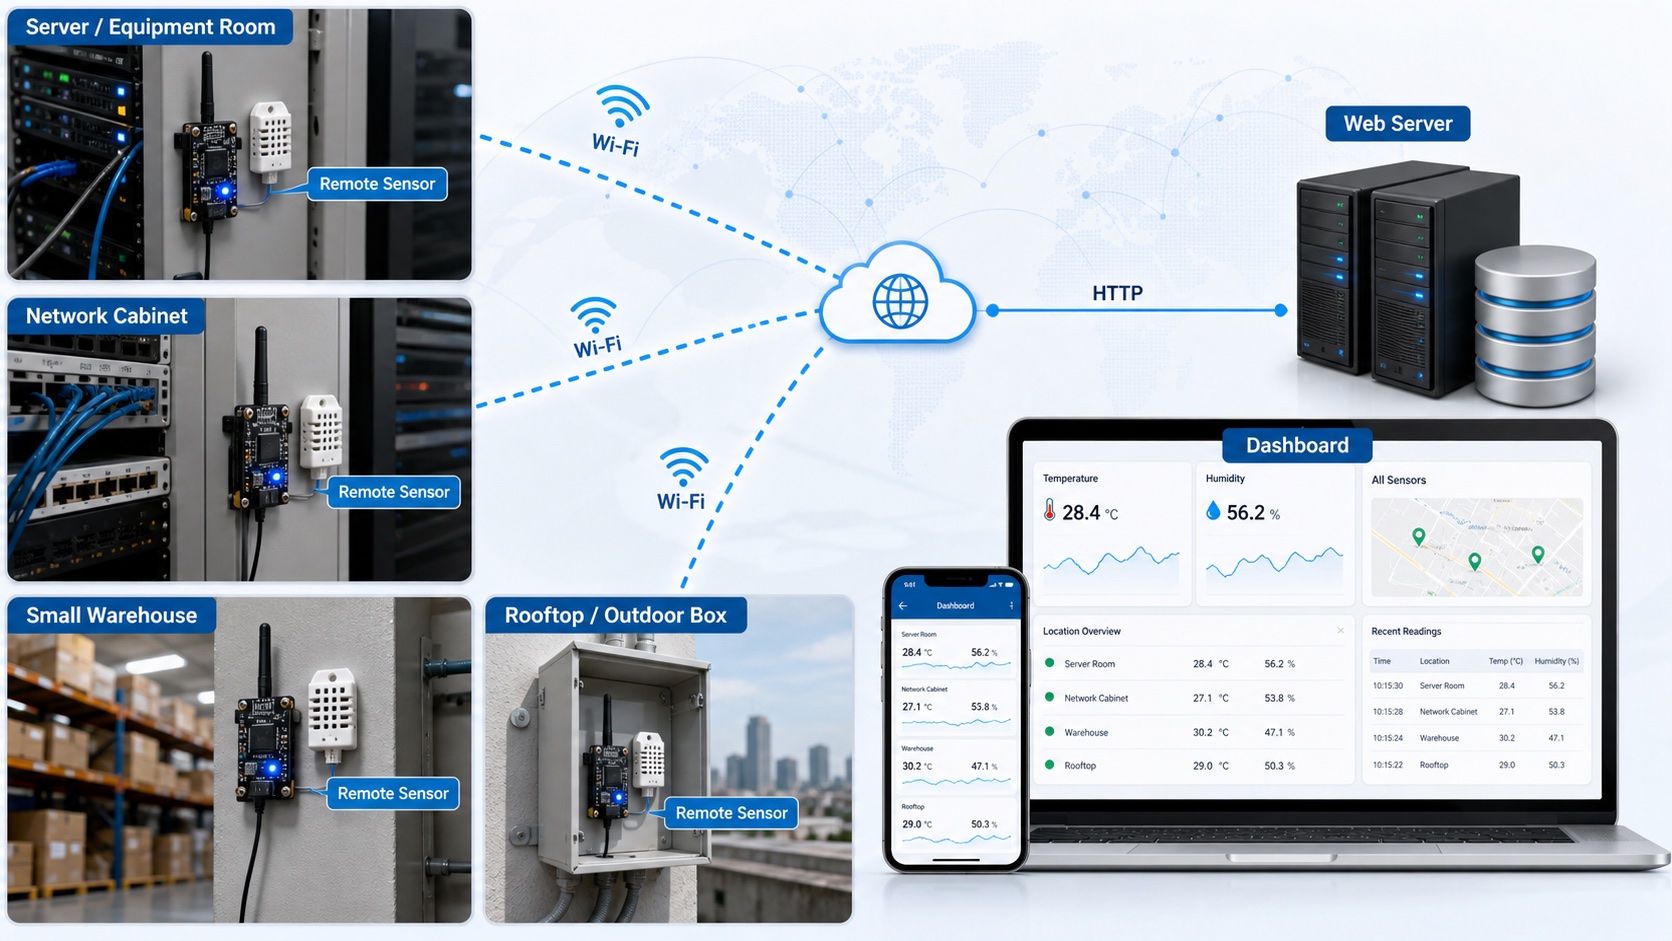
Practical Scenario
Equipment rooms, network cabinets, storage rooms, and rooftop enclosures are often difficult to visit frequently. If air conditioning or ventilation fails, the temperature can rise quickly and cause problems for servers, network devices, recorders, power supplies, and other equipment.
The goal in this example is to install an ESP8266 and DHT22 in such a location and send temperature and humidity readings to a web server every 5 or 10 minutes. Later, the stored data can trigger alerts when the temperature crosses a threshold.
Data Flow
- The ESP8266 reads temperature and humidity from the DHT22.
- It connects to Wi-Fi using the SSID and password written directly in the firmware.
- It sends the readings to a PHP endpoint with HTTP POST.
- The PHP script checks the API key and stores time, device ID, temperature, and humidity in a CSV file.
- A battery-powered device enters deep sleep after transmission to reduce current draw.
This guide starts with the simplest reliable approach: Wi-Fi settings are written directly into the code. Phone-based Wi-Fi setup with AP mode and OTA updates are better handled in the next step.
PHP Receiver
Place a PHP receiver on the web server, for example at /iot-lab/examples/dht22-receive.php. For production, store logs outside the public web root or use a database, but this CSV example is easy to test first.
<?php
// Must match the value in the ESP8266 firmware.
$apiKey = 'CHANGE_THIS_KEY';

if ($_SERVER['REQUEST_METHOD'] !== 'POST') {
  http_response_code(405);
  exit('POST only');
}

if (($_POST['key'] ?? '') !== $apiKey) {
  http_response_code(403);
  exit('bad key');
}

$device = preg_replace('/[^a-zA-Z0-9_-]/', '', $_POST['device'] ?? 'unknown');
$temp = filter_var($_POST['temp'] ?? null, FILTER_VALIDATE_FLOAT);
$hum = filter_var($_POST['hum'] ?? null, FILTER_VALIDATE_FLOAT);

if ($temp === false || $hum === false) {
  http_response_code(400);
  exit('bad value');
}

$line = date('c') . ',' . $device . ',' . $temp . ',' . $hum . PHP_EOL;
$file = __DIR__ . '/dht22-log.csv';

if (!file_exists($file)) {
  file_put_contents($file, "time,device,temp_c,humidity\n");
}

file_put_contents($file, $line, FILE_APPEND | LOCK_EX);
echo 'ok';
ESP8266 Firmware
This sketch reads the DHT22, connects to Wi-Fi, and sends an HTTP POST request. Change WIFI_SSID, WIFI_PASS, DEVICE_ID, API_KEY, and SERVER_URL for your installation.
#include <ESP8266WiFi.h>
#include <ESP8266HTTPClient.h>
#include <WiFiClientSecure.h>
#include <DHT.h>

#define DHTPIN 2        // ESP-01 GPIO2
#define DHTTYPE DHT22

const char* WIFI_SSID = "YOUR_WIFI_NAME";
const char* WIFI_PASS = "YOUR_WIFI_PASSWORD";
const char* DEVICE_ID = "remote-room-01";
const char* API_KEY = "CHANGE_THIS_KEY";
const char* SERVER_URL = "https://iothub.co.kr/iot-lab/examples/dht22-receive.php";

DHT dht(DHTPIN, DHTTYPE);

void setup() {
  Serial.begin(115200);
  delay(1000);
  dht.begin();

  float humidity = dht.readHumidity();
  float temperature = dht.readTemperature();

  if (isnan(humidity) || isnan(temperature)) {
    Serial.println("DHT22 read failed");
    sleepNow();
  }

  WiFi.mode(WIFI_STA);
  WiFi.begin(WIFI_SSID, WIFI_PASS);

  unsigned long start = millis();
  while (WiFi.status() != WL_CONNECTED && millis() - start < 15000) {
    delay(500);
    Serial.print(".");
  }

  if (WiFi.status() == WL_CONNECTED) {
    WiFiClientSecure client;
    client.setInsecure(); // For first testing. Use certificate validation in production.

    HTTPClient http;
    http.begin(client, SERVER_URL);
    http.addHeader("Content-Type", "application/x-www-form-urlencoded");

    String body = "key=" + String(API_KEY) +
                  "&device=" + String(DEVICE_ID) +
                  "&temp=" + String(temperature, 1) +
                  "&hum=" + String(humidity, 1);

    int code = http.POST(body);
    Serial.printf("HTTP %d\n", code);
    Serial.println(http.getString());
    http.end();
  } else {
    Serial.println("Wi-Fi connection failed");
  }

  sleepNow();
}

void loop() {}

void sleepNow() {
  Serial.println("sleep");
  ESP.deepSleep(10 * 60 * 1000000ULL); // Wake up after 10 minutes
}
Check the Upload
Open the serial monitor at 115200 baud after upload. A successful request shows HTTP 200 and ok.
.....
HTTP 200
ok
sleep
ESP-01 and Battery Operation
A small ESP-01 module is useful in tight cabinets, but it should not stay awake when powered by a battery. Wi-Fi consumes too much current for long-term operation, so the usual pattern is wake, measure, transmit, and return to deep sleep.
- Deep-sleep wiring: ESP8266 must connect GPIO16 to RST to wake from deep sleep. Many ESP-01 modules do not expose GPIO16 on the header, so soldering may be required. ESP-12F, ESP-07, or development boards are easier for first tests.
- Measurement interval: Equipment-room monitoring usually does not need 10-second updates. A 5 or 10 minute interval greatly improves battery life.
- Power circuit: Use a low-quiescent-current regulator and avoid always-on LEDs or USB-serial circuits when building a long-life battery node.
- Sensor power: For longer runtime, power the DHT22 only when measuring, using a GPIO or MOSFET-controlled supply path.
- Airflow: Do not fully seal the sensor in a warm case. Leave airflow around the sensor so it measures the room, not the enclosure heat.
Next Step
This guide uses hardcoded Wi-Fi credentials. For a device that will be installed in multiple places, reflashing firmware for every Wi-Fi change is inconvenient. The next step is AP-mode setup from a phone, saved device names and passwords, and OTA firmware updates.