
Home IoT Hub Series · 25
[Part 25] AI Butler Method C: Raspberry Pi Integrated Home IoT Hub
Run the broker, dashboard, alerts, and storage together on a Raspberry Pi as one integrated home IoT server.
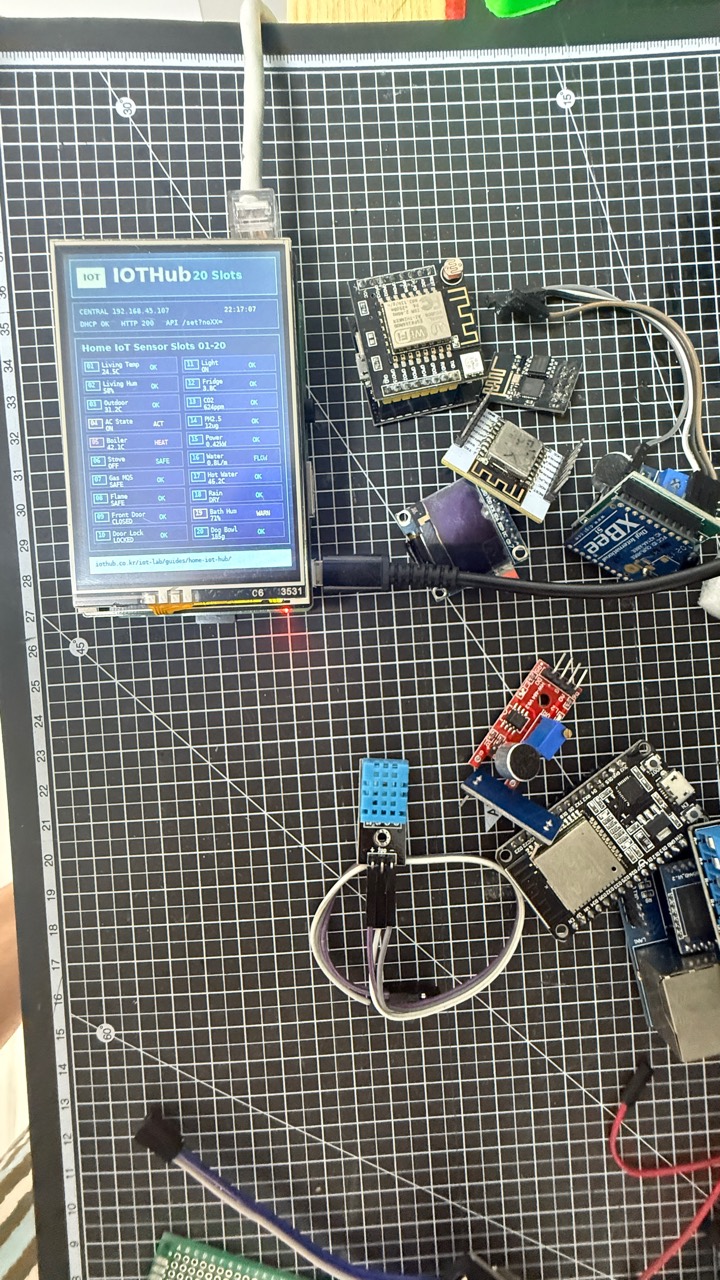
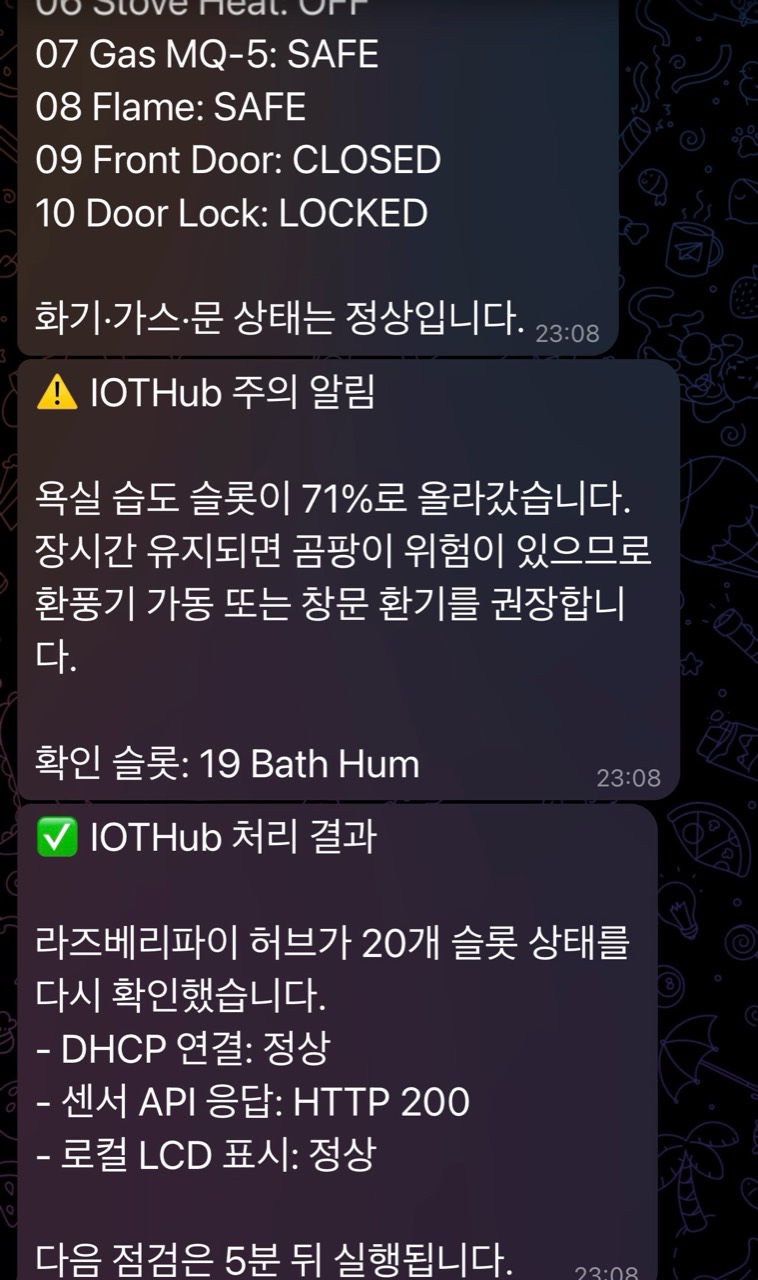
Method C puts the broker, dashboard, alerting, and storage on a Raspberry Pi so the home hub has one small always-on server.
This is not just another sensor node. It is the point where the project becomes a small home IoT platform.
![[Part 25] AI Butler Method C: Raspberry Pi Integrated Home IoT Hub hero image](/iot-lab/assets/raspberry-pi-integrated-home-iot-hero.png)
Parts and cost
| 준비물 | Price | 설명 |
|---|---|---|
| 라즈베리파이 (Zero 2 W 이상) | 20,000원~80,000원 | Zero 2 W면 충분. Pi 4/5는 더 빠름 |
| microSD 카드 16GB+ | 8,000원 | OS 설치용 |
| Pi용 전원 (5V 2.5A) | 5,000원 | 스마트폰 충전기로도 가능 |
| IR LED + 100Ω 저항 + 2N2222 | 500원 | GPIO17에 연결 (17편과 동일 회로) |
| AI API 키 | 종량제 | 23편과 동일 |
| 텔레그램 계정 | 0원 | 24편에서 이미 만듦 |
| 추가 비용 | 약 33,500원~ |
Full code
[Part 25] AI Butler Method C: Raspberry Pi Integrated Home IoT Hub - Code 4
from flask import Flask, request, jsonify
import requests
import threading
import time
import json
import urllib.request
import urllib.parse

# =============================================
# 1. 설정 (직접 입력!)
# =============================================
OPENAI_API_KEY = "sk-your-api-key-here"
OPENAI_URL     = "https://api.openai.com/v1/chat/completions"
AI_MODEL       = "gpt-3.5-turbo"

TELEGRAM_BOT_TOKEN = "123456:ABC-DEF1234ghijk"
YOUR_CHAT_ID = 123456789

# =============================================
# 2. Flask 앱
# =============================================
app = Flask(__name__)

SLOT_COUNT = 20
slots = ["--"] * SLOT_COUNT

LABELS = [
    "Living Temp","Living Hum","Outside Temp","AC",
    "Boiler","Stove","Gas Leak","Fire",
    "Front Door","Door Lock","Living Light","Fridge Temp",
    "CO2","Dust PM2.5","Power","Water",
    "Hot Water","Rain","Bath Hum","Pet Bowl"
]

latest_data = {}
pending_commands = {}
last_ai_time = 0
AI_INTERVAL = 300

# =============================================
# 3. 센서값 수신 (ESP32의 /set 대체)
# =============================================
@app.route('/set', methods=['GET'])
def receive_sensor():
    """센서 노드들이 보내는 데이터를 받는다"""
    updated = 0
    for i in range(1, SLOT_COUNT + 1):
        key = f"no{i}"
        if key in request.args:
            slots[i - 1] = request.args[key]
            latest_data[key] = request.args[key]
            updated += 1
    if updated > 0:
        print(f"[DATA] Updated {updated} slots")
    return jsonify({"updated": updated})

@app.route('/status')
def status():
    return jsonify(latest_data)

@app.route('/')
def dashboard():
    """HTML 대시보드"""
    html = '<!DOCTYPE html><html lang="ko"><head>'
    html += '<meta charset="UTF-8"><meta name="viewport" content="width=device-width,initial-scale=1.0">'
    html += '<title>IoT Hub - Pi AI</title>'
    html += '<style>'
    html += '*{margin:0;padding:0;box-sizing:border-box;}'
    html += 'body{font-family:sans-serif;background:#1a1a2e;color:#eee;padding:16px;}'
    html += 'h1{text-align:center;font-size:1.3rem;color:#e94560;}'
    html += '.grid{display:grid;grid-template-columns:repeat(auto-fill,minmax(180px,1fr));gap:10px;}'
    html += '.card{background:#16213e;padding:12px;border-radius:8px;border-left:4px solid #0f3460;}'
    html += '.card.warn{border-left-color:#e94560;background:#1c0e1a;}'
    html += '.card .label{font-size:.8rem;color:#a0a0b0;}'
    html += '.card .value{font-size:1.2rem;font-weight:700;}'
    html += '</style></head><body><h1>IoT Hub - Pi AI</h1><div class="grid">'

    for i in range(SLOT_COUNT):
        val = latest_data.get(f"no{i+1}", "--")
        is_warn = False
        if i in [6,7,8] and val not in ("0", "--"): is_warn = True
        if i == 19 and val != "--":
            try:
                if int(val) < 50: is_warn = True
            except: pass
        cls = ' class="warn"' if is_warn else ""
        html += f'<div{cls}><div class="label">#{i+1} {LABELS[i]}</div>'
        html += f'<div class="value">{val}</div></div>'

    html += '</div></body></html>'
    return html

# =============================================
# 4. 명령 실행 + Pi GPIO IR 제어
# =============================================
@app.route('/command', methods=['GET'])
def send_command():
    """24편 호환용. 실제 명령은 텔레그램 → execute_commands에서 처리"""
    return "{}"

def execute_commands(cmds):
    """텔레그램에서 받은 명령을 실제 액션으로 실행"""
    for key, val in cmds.items():
        print(f"[CMD] Executing: {key}={val}")

        # 슬롯 업데이트
        slot_num = int(key.replace("no", ""))
        if 1 <= slot_num <= SLOT_COUNT:
            slots[slot_num - 1] = val
            latest_data[key] = val

        # AC(4번) IR 송출
        if key == "no4" and IR_ENABLED:
            try:
                import pigpio
                pi = pigpio.pi()
                code = AC_ON_CODE if val == "ON" else AC_OFF_CODE
                if code != 0x0:
                    send_ir_nec(pi, code)
                    print(f"[IR] Sent {'ON' if val == 'ON' else 'OFF'} via GPIO{IR_PIN}")
                else:
                    print("[IR] AC code not set. Run 17편 to learn IR codes first.")
                pi.stop()
            except ImportError:
                print("[IR] pigpio not installed. Run: sudo apt install pigpio && sudo systemctl start pigpiod && pip3 install pigpio")
            except Exception as e:
                print(f"[IR] Error: {e}")
                send_telegram(YOUR_CHAT_ID, f"IR 송출 실패: {e}")

def send_ir_nec(pi, code, bits=32):
    """pigpio로 38kHz NEC 코드 송출"""
    # NEC 프로토콜: 리더(9ms ON + 4.5ms OFF) + 데이터 비트
    # 비트 0: 562μs ON + 562μs OFF
    # 비트 1: 562μs ON + 1687μs OFF
    carrier = 38000  # 38kHz
    duty_cycle = 0.33

    # 리더 코드
    pi.hardware_PWM(IR_PIN, carrier, int(duty_cycle * 1e6))
    time.sleep(0.009)  # 9ms
    pi.hardware_PWM(IR_PIN, 0, 0)
    time.sleep(0.0045) # 4.5ms

    # 데이터 비트
    for i in range(bits):
        pi.hardware_PWM(IR_PIN, carrier, int(duty_cycle * 1e6))
        time.sleep(0.000562) # 562μs ON
        pi.hardware_PWM(IR_PIN, 0, 0)
        if code & (1 << i):
            time.sleep(0.001687) # 비트 1: 1687μs
        else:
            time.sleep(0.000562) # 비트 0: 562μs

    pi.hardware_PWM(IR_PIN, carrier, int(duty_cycle * 1e6))
    time.sleep(0.000562) # Stop bit
    pi.hardware_PWM(IR_PIN, 0, 0)

# IR 설정
IR_PIN = 17        # GPIO17 (Pi 핀 11)
IR_ENABLED = False  # IR LED 연결 후 True로 변경
AC_ON_CODE  = 0x0   # 17편에서 학습한 ON 코드
AC_OFF_CODE = 0x0   # 17편에서 학습한 OFF 코드

# =============================================
# 5. 텔레그램 명령 처리
# =============================================
def handle_telegram(text):
    """네가 보낸 메시지를 분석해서 명령으로 변환"""
    global pending_commands
    t = text.lower().strip()

    if "에어컨" in text or "ac" in t:
        if "켜" in text or "on" in t:
            pending_commands["no4"] = "ON"
            return "에어컨 ON 완료"
        elif "꺼" in text or "off" in t:
            pending_commands["no4"] = "OFF"
            return "에어컨 OFF 완료"

    if "조명" in text or "불" in text or "light" in t:
        if "켜" in text or "on" in t:
            pending_commands["no11"] = "ON"
            return "조명 ON 완료"
        elif "꺼" in text or "off" in t:
            pending_commands["no11"] = "OFF"
            return "조명 OFF 완료"

    if "상태" in text or "집" in text or "status" in t:
        return build_status_report()

    # 직접 인식 못 한 메시지는 AI에게 위임
    # AI가 네 의도를 해석해서 적절한 행동을 결정한다
    try:
        ai_reply = ask_ai_about_command(text)
        return ai_reply
    except:
        return None

def ask_ai_about_command(user_text):
    """네 메시지를 AI가 해석해서 어떤 행동을 할지 결정"""
    data_text = "\n".join(
        f"{LABELS[i]}: {latest_data.get(f'no{i+1}', '--')}"
        for i in range(SLOT_COUNT)
    )
    resp = requests.post(
        OPENAI_URL,
        headers={"Authorization": f"Bearer {OPENAI_API_KEY}",
                 "Content-Type": "application/json"},
        json={"model": AI_MODEL,
              "messages": [
                  {"role": "system",
                   "content": "You are a smart home controller. The user will send "
                   "commands in Korean. Interpret their intent and decide what to do. "
                   "Available actions: turn AC ON/OFF (no4), turn light ON/OFF (no11). "
                   "Respond in Korean. Keep it under 2 sentences. "
                   "If the command can be executed, start with 'EXEC:' followed by "
                   "the JSON actions like {\"no4\":\"ON\"}. "
                   "If it's just a question, answer naturally."},
                  {"role": "user",
                   "content": f"Sensor data:\n{data_text}\n\nUser said: {user_text}"}
              ], "max_tokens": 200},
        timeout=30
    )
    if resp.status_code == 200:
        content = resp.json()["choices"][0]["message"]["content"]
        # AI가 EXEC: 명령을 줬으면 실행
        if "EXEC:" in content:
            try:
                exec_start = content.index("EXEC:") + 5
                exec_end = content.index("}", exec_start) + 1
                exec_json = content[exec_start:exec_end]
                cmds = json.loads(exec_json)
                execute_commands(cmds)
                # 실행했으면 남은 메시지만 반환
                remaining = content[exec_end:].strip()
                return remaining if remaining else "실행 완료했습니다"
            except:
                pass
        return content
    return "죄송합니다, 응답을 생성하지 못했습니다."

def build_status_report():
    if not latest_data:
        return "아직 센서 데이터가 없습니다."
    r = "집 상태\n\n"
    w = []
    for i in range(SLOT_COUNT):
        v = latest_data.get(f"no{i+1}", "--")
        r += f"  {LABELS[i]}: {v}\n"
        if i == 6 and v not in ("0", "--"): w.append("가스 누출!")
        if i == 7 and v not in ("0", "--"): w.append("화재 감지!")
        if i == 8 and v not in ("0", "--"): w.append("현관문 열림!")
        if i == 19 and v != "--":
            try:
                if int(v) < 50: w.append("반려견 밥 보충!")
            except: pass
    if w: r += "\n" + "\n".join(w)
    return r

# =============================================
# 6. AI 분석 → 텔레그램 보고 (5분 간격)
# =============================================
def ai_loop():
    global last_ai_time
    while True:
        time.sleep(30)
        if not latest_data: continue
        if time.time() - last_ai_time < AI_INTERVAL: continue
        last_ai_time = time.time()

        try:
            data_text = "\n".join(
                f"{LABELS[i]}: {latest_data.get(f'no{i+1}', '--')}"
                for i in range(SLOT_COUNT)
            )
            resp = requests.post(
                OPENAI_URL,
                headers={"Authorization": f"Bearer {OPENAI_API_KEY}",
                         "Content-Type": "application/json"},
                json={"model": AI_MODEL,
                      "messages": [
                          {"role": "system",
                           "content": "You are an AI home assistant. Analyze the sensor data "
                           "and send a Korean message to the homeowner. "
                           "1) Report any warnings immediately. "
                           "2) Point out anomalies (e.g., high CO2, door open too long). "
                           "3) Suggest concrete actions. "
                           "4) Ask if they want you to execute the action. "
                           "Keep it conversational, like a helpful butler. "
                           "Under 4 sentences."},
                          {"role": "user", "content": data_text}
                      ], "max_tokens": 250},
                timeout=30
            )
            if resp.status_code == 200:
                content = resp.json()["choices"][0]["message"]["content"]
                print(f"[AI] {content}")
                # AI 분석 결과를 텔레그램으로 전송
                send_telegram(YOUR_CHAT_ID, "[AI 분석]\n" + content)
            else:
                print(f"[AI] API error: {resp.status_code}")
        except Exception as e:
            print(f"[AI] Error: {e}")

# =============================================
# 7. 텔레그램 봇 (메시지 수신 + 답장)
# =============================================
def telegram_loop():
    base = f"https://api.telegram.org/bot{TELEGRAM_BOT_TOKEN}"
    last_id = 0
    print("[TELEGRAM] Bot started. Send /start to begin.")

    while True:
        time.sleep(3)
        try:
            u = f"{base}/getUpdates?offset={last_id+1}&timeout=10"
            resp = requests.get(u, timeout=15).json()
            for upd in resp.get("result", []):
                last_id = upd["update_id"]
                if "message" not in upd: continue
                m = upd["message"]
                cid = m["chat"]["id"]
                txt = m.get("text", "")
                print(f"[TELEGRAM] {cid}: {txt}")

                if txt == "/start":
                    send_telegram(cid,
                        "AI 집사입니다.\n\n"
                        "'상태' — 집 상태 확인\n"
                        "'에어컨 켜줘/꺼줘' — 에어컨 제어\n"
                        "'조명 켜줘/꺼줘' — 조명 제어\n"
                        "그 외 질문도 자유롭게 물어보세요.\n"
                        f"Chat ID: {cid}")
                    continue

                # 먼저 간단한 명령어 체크
                reply = handle_telegram(txt)
                if reply:
                    send_telegram(cid, reply)
                    # 명령이 있었으면 execute_commands 호출
                    if pending_commands:
                        execute_commands(pending_commands)
                        pending_commands = {}
                else:
                    send_telegram(cid, "'상태', '에어컨 켜줘/꺼줘' 또는 자유롭게 물어보세요.")
        except Exception as e:
            print(f"[TELEGRAM] Error: {e}")

def send_telegram(cid, text):
    url = f"https://api.telegram.org/bot{TELEGRAM_BOT_TOKEN}/sendMessage"
    urllib.request.urlopen(url, urllib.parse.urlencode(
        {"chat_id": cid, "text": text}).encode())

# =============================================
# 8. 실행
# =============================================
if __name__ == "__main__":
    # __name__ == "__main__" — 이 파일을 직접 실행할 때만 아래 코드가 돈다.
    # 다른 파일에서 import 했을 때는 실행되지 않는다.
    # Python의 관습적인 주문 같은 거니까 신경 쓰지 마라.

    # 백그라운드에서 계속 도는 두 개의 작은 프로그램을 시작한다.
    threading.Thread(target=ai_loop, daemon=True).start()
    threading.Thread(target=telegram_loop, daemon=True).start()

    print("=" * 50)
    print("  IoT Hub - Pi AI Edition")
    print("  센서 노드 → http://Pi_IP:5000/set?no1=값")
    print("  텔레그램 봇 → @MyHomeAIBot")
    print("  AI 분석 → 5분 간격 자동 보고")
    print("=" * 50)

    app.run(host="0.0.0.0", port=5000, debug=False)
[Part 25] AI Butler Method C: Raspberry Pi Integrated Home IoT Hub - Code 5
pip3 install flask requests
# IR 제어를 쓰려면:
sudo apt install pigpio -y && sudo systemctl start pigpiod && pip3 install pigpio
[Part 25] AI Butler Method C: Raspberry Pi Integrated Home IoT Hub - Code 7
crontab -eBuild notes
- Boot the Raspberry Pi headless, run the Python service, and confirm the ESP32 can reach it on the local network.
- Power on the hub brain first so the node can join
IoT_Hub_Net. - Use the same slot number written in the source code.
- Open the serial monitor at 115200 baud and confirm
HTTP 200. - If the value does not appear on the hub, recheck wiring, GPIO number, and Wi-Fi connection.