
Today's Build Guide
ESP8266 + DHT22 Room Climate Logger
Connect a DHT22 sensor to an ESP8266, upload Arduino IDE code, and read temperature and humidity in the serial monitor. After this first check, the same device can be extended for server upload, storage, and alerts.
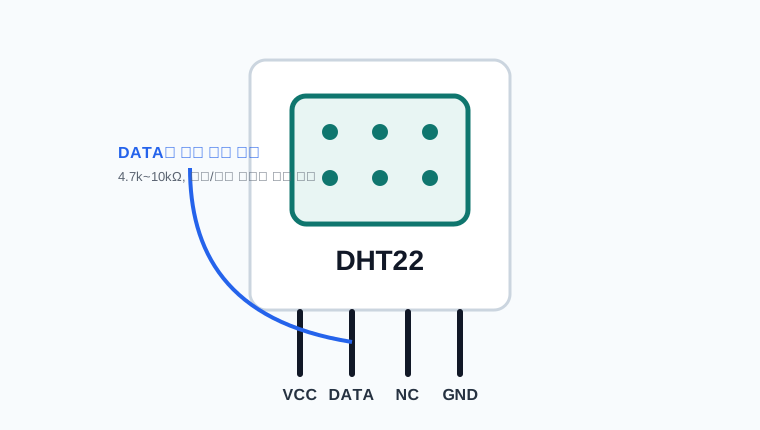
Build Goal
The ESP8266 reads the DHT22 every two seconds and prints temperature and humidity to the Arduino IDE serial monitor. At this stage, the goal is to confirm stable sensor readings before adding Wi-Fi upload or storage.
Parts
- ESP8266 development board: NodeMCU or Wemos D1 mini style
- DHT22 temperature and humidity sensor: 3-pin module or 4-pin sensor
- 4.7kΩ-10kΩ resistor for DATA pull-up when using a bare 4-pin sensor
- USB cable, breadboard, and jumper wires
Many DHT22 modules already include a pull-up resistor. A bare 4-pin DHT22 sensor is more reliable when a pull-up resistor is added between DATA and VCC.
Wiring
This example connects DHT22 DATA to D2 on the ESP8266. On NodeMCU-style boards, D2 maps to GPIO4.
| DHT22 VCC | ESP8266 3V3 |
|---|---|
| DHT22 DATA | ESP8266 D2(GPIO4) |
| DHT22 GND | ESP8266 GND |
| Pull-up resistor | 4.7kΩ-10kΩ between DATA and VCC |
Some DHT22 products support 5V power, but ESP8266 GPIO is 3.3V logic. For a first build, powering the sensor from 3V3 is the safer setup.
Arduino IDE Setup
- Install the ESP8266 board package in Arduino IDE.
- Select your board, such as NodeMCU 1.0 or LOLIN(WEMOS) D1 mini.
- Install DHT sensor library and Adafruit Unified Sensor from Library Manager.
- Select the USB port and upload the code below.
Arduino Example Code
| 1 | #include <DHT.h> |
| 2 | |
| 3 | #define DHTPIN D2 |
| 4 | #define DHTTYPE DHT22 |
| 5 | |
| 6 | DHT dht(DHTPIN, DHTTYPE); |
| 7 | |
| 8 | void setup() { |
| 9 | Serial.begin(115200); |
| 10 | delay(1000); |
| 11 | Serial.println(); |
| 12 | Serial.println("ESP8266 DHT22 room monitor start"); |
| 13 | dht.begin(); |
| 14 | } |
| 15 | |
| 16 | void loop() { |
| 17 | float humidity = dht.readHumidity(); |
| 18 | float temperature = dht.readTemperature(); |
| 19 | |
| 20 | if (isnan(humidity) || isnan(temperature)) { |
| 21 | Serial.println("DHT22 read failed. Check wiring and power."); |
| 22 | delay(2000); |
| 23 | return; |
| 24 | } |
| 25 | |
| 26 | Serial.print("Temperature: "); |
| 27 | Serial.print(temperature, 1); |
| 28 | Serial.print(" C "); |
| 29 | Serial.print("Humidity: "); |
| 30 | Serial.print(humidity, 1); |
| 31 | Serial.println(" %"); |
| 32 | |
| 33 | delay(2000); |
| 34 | } |
Read the Values
After upload, open the Arduino IDE serial monitor and set the speed to 115200 baud. A working setup prints values every two seconds.
| 1 | ESP8266 DHT22 room monitor start |
| 2 | Temperature: 24.8 C Humidity: 51.2 % |
| 3 | Temperature: 24.8 C Humidity: 51.1 % |
| 4 | Temperature: 24.9 C Humidity: 51.0 % |
Troubleshooting
- If DHT22 read failed repeats, check VCC, GND, and DATA wiring.
- If you use a bare 4-pin sensor, confirm the pull-up resistor is between DATA and VCC.
- Make sure
DHTPIN D2matches the actual connected pin. - Check that the serial monitor speed is 115200 baud.
- If readings jump, keep your hand away from the sensor and wait at least 10 seconds in open air.
Next Steps
Once serial readings are stable, the next step is to send the values to a web server over Wi-Fi. The extended guide covers HTTP POST upload, PHP receiving, and battery deep-sleep operation for small modules such as the ESP-01.